Search Results
Configuration & Getting Started
Follow these steps to configure the application. These settings are accessible via the File menu.
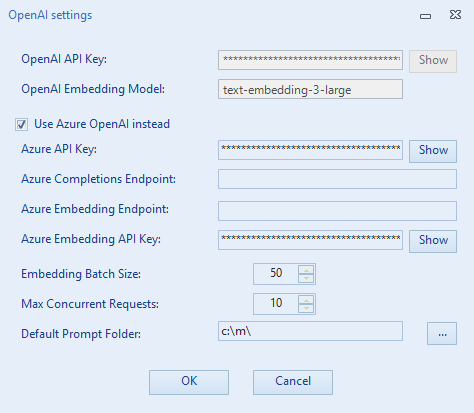
1. OpenAI Settings
Go to File → OpenAI settings to configure your connection to OpenAI. It is possible to use either direct OpenAI hosting or OpenAI models on Azure (both for completions and for embedding).
- OpenAI API Key: Enter and save your OpenAI API Key (Required for direct OpenAI usage).
- Embedding Model: Define the model for analyzing reference files (e.g.,
text-embedding-3-large). -
Use Azure OpenAI instead:
- When ticked, you must specify the Azure API Key, Completions Endpoint, Embedding Endpoint, and Azure Embedding API Key for your deployed models.
- All other settings (like batch size and max concurrent requests) apply regardless of the host.
-
Performance Settings:
- Embedding Batch Size: Segments sent in a single embedding request.
- Max Concurrent Requests: Limit parallel requests to avoid rate limits.
-
Default Prompt Folder:
- Directory where prompt templates are stored.
Tip: Use a shared network folder if multiple Project Managers (PMs) need to access the same set of standard prompts.
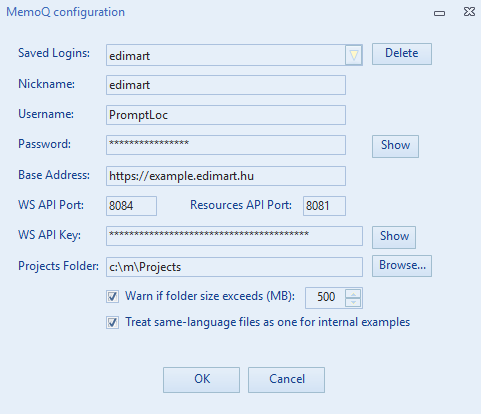
2. MemoQ Server Configuration
Go to File → MemoQ configuration to manage server connections.
https://example.company.com:8081. In this example, the Base Address is https://example.company.com and the Port is 8081.
-
Connection Details:
- Base Address: Server URL (e.g.,
https://example.company.com) without port. - Resources API Port: Port number for the Resources API (e.g.,
8081). - WS API: WS API Port and Key (Optional, for Connected Mode).
- Base Address: Server URL (e.g.,
-
Login Credentials:
- Use a MemoQ user with Resource Lookup rights. (See MemoQ Documentation).
- Nicknames: Save multiple logins with nicknames to switch easily.
-
Projects Folder:
- Used for temporary storage of downloaded files, logs, and processed outputs.
- Folder Size Warning: Set a threshold (MB) for disk usage alerts.
-
Treat same-language files as one:
- Checked: Internal TM (fuzzy matches) is preserved across all files in a batch.
- Unchecked: Matches reset for each file.
- Important: Ensure the Resources API is enabled on your MemoQ server. It is free but may need to be activated by support.
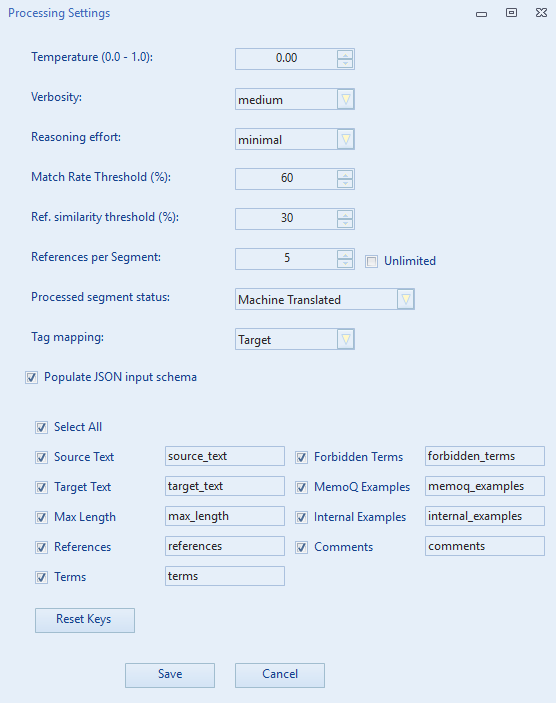
3. Advanced Processing Settings
Go to File → Advanced processing settings to fine-tune the LLM behavior.
-
LLM Parameters:
- Temperature: Controls randomness (0.0 - 1.0). Lower values make the output more deterministic.
- Verbosity: Controls the verbosity level of the model's output (Low, Medium, High).
-
Reasoning Effort: Controls how much time reasoning models (like
gpt-5.1orgpt-5.2) spend "thinking" before generating a response.
Read more on reasoning effort here.Tip: Smaller, faster models (gpt-5-mini and gpt-5-nano) are less expensive per token, but they may compromise linguistic quality. Experiment.
-
Thresholds & Limits:
- Match Rate Threshold (%): The minimum similarity score required for a TM match to be included as an example.
- Ref. Similarity Threshold (%): The minimum cosine similarity score required for a reference segment to be included in the context.
- References per Segment: The maximum number of reference segments to inject for each source segment.
-
Processed Segment Status:
- Choose the status to assign to segments after translation (e.g., "Machine Translated", "Edited", "Confirmed").
-
Tag Mapping:
- Determines whether tags in the LLM response should be mapped to the Source or Target segments.
- The response will contain placeholders like
{{1}},{{2}}. These are replaced by the actual tag content from the chosen segment. Note that extra or missing tags are not resolved automatically.
-
Populate JSON input schema:
- Checked (Rich Schema Mode - Recommended): The application automatically injects segment data into a rich JSON structure. You can customize which fields to include and rename JSON keys.
- Unchecked (Legacy Mode): Uses simple text placeholders in the prompt.
- Note: For detailed instructions, see the Prompting Guide.
Interface & Operation Guide
Write to (Output mode)
Use Write to to control where PromptLoc writes the model’s result:
- Target: Writes the response into the target segment (updates the MQXLIFF).
- Source: Writes the response into the source segment (updates the MQXLIFF).
- CSV: Does not write back into the MQXLIFF at all. Instead, PromptLoc exports the inputs + the model response into a CSV file. This is useful for term extraction, QA checks, content analysis, or any workflow where you want results without modifying memoQ files.
CSV output location
When Write to = CSV, PromptLoc saves a file named *_processed.csv into a processed subfolder next to the source file.
What the CSV contains
- In Rich Schema Mode, the CSV includes the enabled schema fields (using your configured JSON key names) plus a
Responsecolumn. - In Legacy Mode, the CSV contains Source Text, Target Text, and Response.
Note: In Connected Project Mode, CSV export is a “read-only” workflow: the memoQ project is not updated because no MQXLIFF is written.
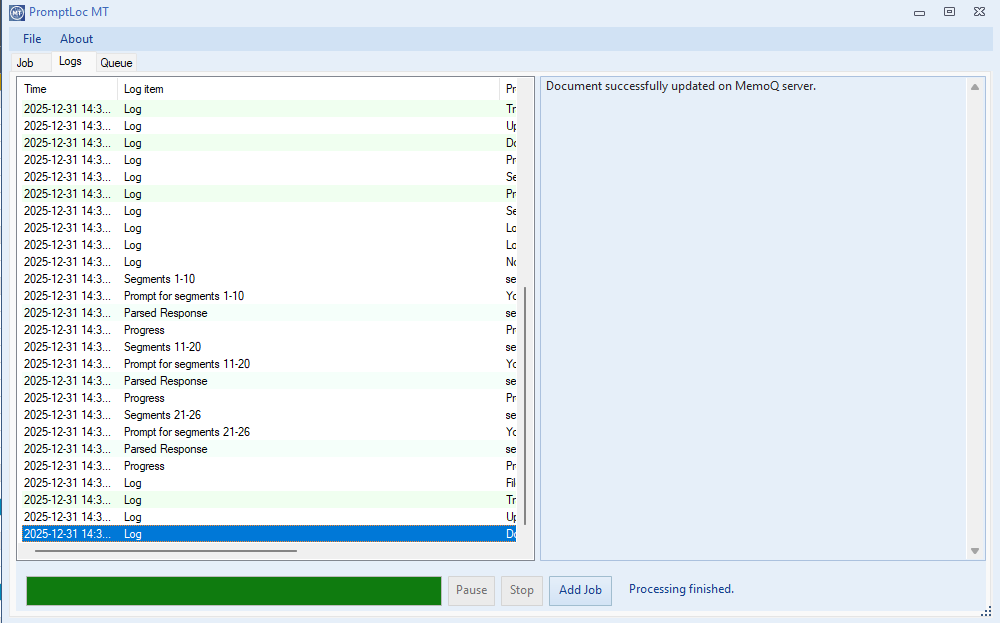
Outputs and Logging
- Translated Files: Located in
[SourceFolder]\PromptLocMT_Output\translated. - Logs: Located in
[SourceFolder]\PromptLocMT_Output\logs. - UI Log: The Logs tab displays a real-time log of the process. You can click on log entries to see detailed JSON payloads and responses.
Job Queue & Batch Processing
The Queue tab allows you to manage multiple translation jobs.
- Adding Jobs: Configure a file or folder and click "Add to queue" (or "Start" if the queue is empty). You can continue adding more jobs while the processor is running.
- Monitoring: The list displays the status of each file (Queued, Running, Completed) and an estimated time of arrival (ETA).
- Removing Jobs: Select one or more items in the queue and click "Remove Selected" to cancel them.
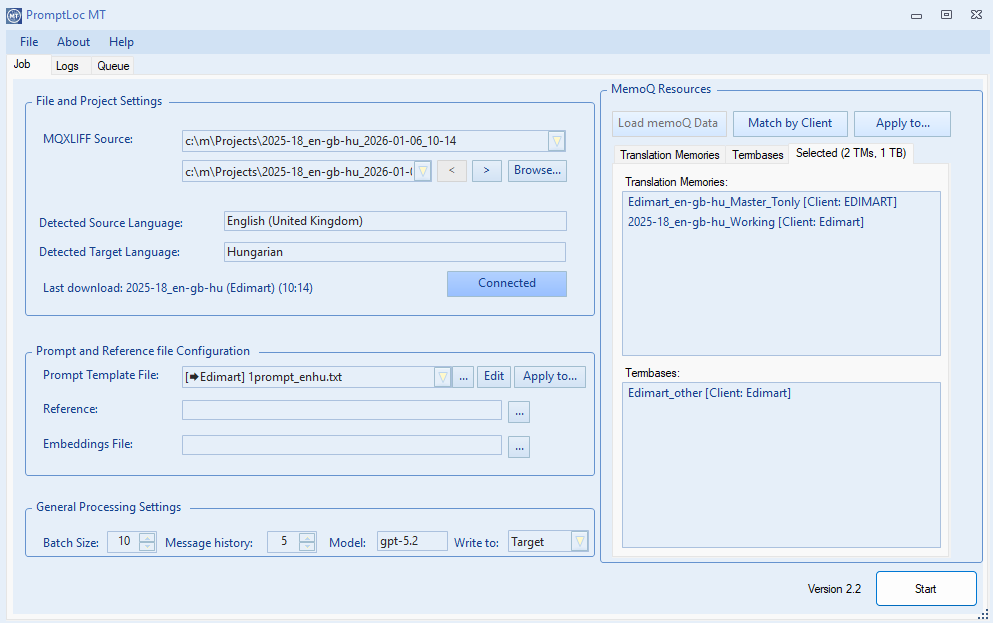
memoQ Resource Selection (TMs & TBs)
PromptLoc can use memoQ Translation Memories (TMs) and Term Bases (TBs) as context during processing. Resource selection is stored per file (especially important in folder/batch mode), and you can manage selections manually, via client-based matching, or automatically (when connected to a memoQ project).
1) Fully Manual Selection
In manual mode, you select resources directly from the available TM/TB lists:
- Check the TMs and TBs you want to use for the current file.
- Your selection is saved for that file and can differ across files in the same batch.
- This is the default approach in Local Mode, and it’s also available in Connected Mode if you want to override server selections.
- Use this when you want precise control or when no consistent client naming/assignment exists.
2) Match by Client (Semi-Automatic)
The Match by Client button helps you quickly find suitable resources using two filters:
- Client IDs (entered manually)
- The file’s language pair (parsed from the MQXLIFF)
How it works:
- Clicking Match by Client opens a small dialog where you enter one or more Client IDs (comma-separated).
- PromptLoc then searches the available memoQ resources and automatically selects:
- TMs whose client matches one of the entered IDs and contain the file’s language pair
- TBs whose client matches one of the entered IDs and support both languages
This mode is useful when your resources are consistently labeled with client IDs and you want a fast starting point, while still being able to fine-tune afterward.
3) Fully Automatic (Connected Project: Copy Server Assignments)
This option applies when you work in Connected Project Mode and download documents from a memoQ project.
- PromptLoc retrieves the project’s TM/TB assignments from the server via the WS API.
- These assignments are applied per downloaded document, based on the document’s target language.
- In other words: the app doesn’t “guess” resources — it applies the server-side resource assignment blocks returned for each target language.
- If memoQ returns no assignments for a target language, the file may end up with no automatically selected TMs/TBs for that language.
- You can still manually adjust after automatic assignment (add/remove resources as needed).
The Selected Tab (Overview + Remove)
The Selected tab is the quickest way to verify what will be used for the current file:
- It shows the currently selected TMs and TBs for that file, regardless of how they were selected (manual, Match by Client, automatic).
- In folder/batch mode, switching files updates the Selected tab to reflect that file’s saved configuration.
Removing resources (right-click)
- You can remove one or more selected resources by right-clicking in the Selected list and choosing Remove.
- Removing an item also clears its checkmark in the corresponding available TM/TB checklist.
- This removal affects only the current file’s configuration (it does not change anything on the memoQ server).
Applying Settings to Multiple Files
When working with a folder or a project with multiple files, you can quickly propagate your settings.
-
Apply Resources: Click the arrow next to the "Apply for all" button (Resources section) to choose:
- Same-language files in job: Applies the selected TMs/TBs only to files with the exact same language pair.
- All files in job: Applies to every file in the list.
- Apply Prompt: Similarly, use the "Apply for all" button in the Prompt section to use the current template for other files.
Prompt Selection & Client Metadata
- Prompt Dropdown: Select a prompt template from your configured
Default Prompt Folder. -
Client Matching:
- Prompt templates can contain a special metadata line:
### CLIENT METADATA: ClientName. - When you connect to a MemoQ project, the application reads the project's "Client" field.
- Prompts that match the project's client are automatically prioritized (sorted to the top) in the dropdown list.
- You can manually add client metadata to a prompt by selecting it while connected to a project; the application will ask if you want to add the current client to the template.
- Prompt templates can contain a special metadata line:
Modes of Operation
Local Mode
Available for all memoQ server users
- Go to your memoQ project and export file(s) and/or views in
mqxliff. - Open PromptLoc and select an individual
.mqxlifffile or a folder containing multiple files. - Folder Mode: If you select a folder, a file list appears. You can navigate between files and apply settings individually or in bulk.
- Resource matching (TMs/TBs) must be done manually or via the "Match by Client" feature.
- Results are saved locally. You must manually import them back into MemoQ.
Connected Project Mode
Only available for users with the memoQ WS API
- Click "Connect to Project" to browse your memoQ project.
- Select a project and specific documents to download.
- Resources (TMs/TBs) are automatically matched based on the project settings on the server. Leave them as is or change as necessary.
- When processing completes, the processed/translated file is automatically uploaded to the server, and the project is updated.
Example Workflows
This guide provides example workflows for using PromptLoc in different scenarios. While many other use cases are possible, these examples cover the most common tasks.
1. Translation
This is the standard workflow for translating documents using the power of LLMs combined with MemoQ resources.
Configuration
- Write to: Set to Target.
- Resources: Ensure relevant Translation Memories and Term Bases are selected to provide context.
Example Prompts
For detailed instructions on constructing these prompts, see the Prompting Guide.
Legacy Mode Prompt:
Use the following terminology:
%TERMS%
Use these examples for style:
%EXAMPLES%
Rich Schema Mode Prompt:
Input Format:
- "source_text": The text to translate.
- "terms": Mandatory terminology.
- "memoq_examples": Past translation examples.
Return a JSON object with the translated text for each segment key.
2. Revision
In this workflow, you use the LLM to review or edit existing translations (e.g., from a different engine or a human draft). This requires the Rich Schema Mode.
Configuration
- Write to: Set to Target (this overwrites the existing target with the revised version).
-
Schema Settings:
- Enable Populate JSON input schema.
- Ensure Target Text is checked (so the LLM can see the draft).
- You might rename the key
target_texttodraft_translationin the settings to make it clearer for the LLM.
Example Prompt (Schema Mode Only)
Ensure you follow the structure defined in the Prompting Guide.
- "source_text": The original source.
- "draft_translation": A draft translation that needs review.
- "terms": Mandatory terminology.
Your task is to revise the "draft_translation" to ensure accuracy and fluency.
- Fix any terminology errors based on the "terms" provided.
- Improve style and grammar.
- If the draft is perfect, return it unchanged.
Return a JSON object with the revised translations.
Scenario 2: Tag Fixing
Download Tag Fixer PromptThis scenario addresses common issues where tags in the target text are misplaced, missing, or incorrectly formatted due to translation errors or external plugin artifacts. Such errors include disordered tags, stripped formatting (bold/italic), or incorrect spacing.
You can use a specialized "Tag Fixer" prompt (downloadable above) to automatically identify and correct these tag problems, ensuring the target structure matches the source. Note that for extremely tag-heavy segments, manual review may still be necessary.
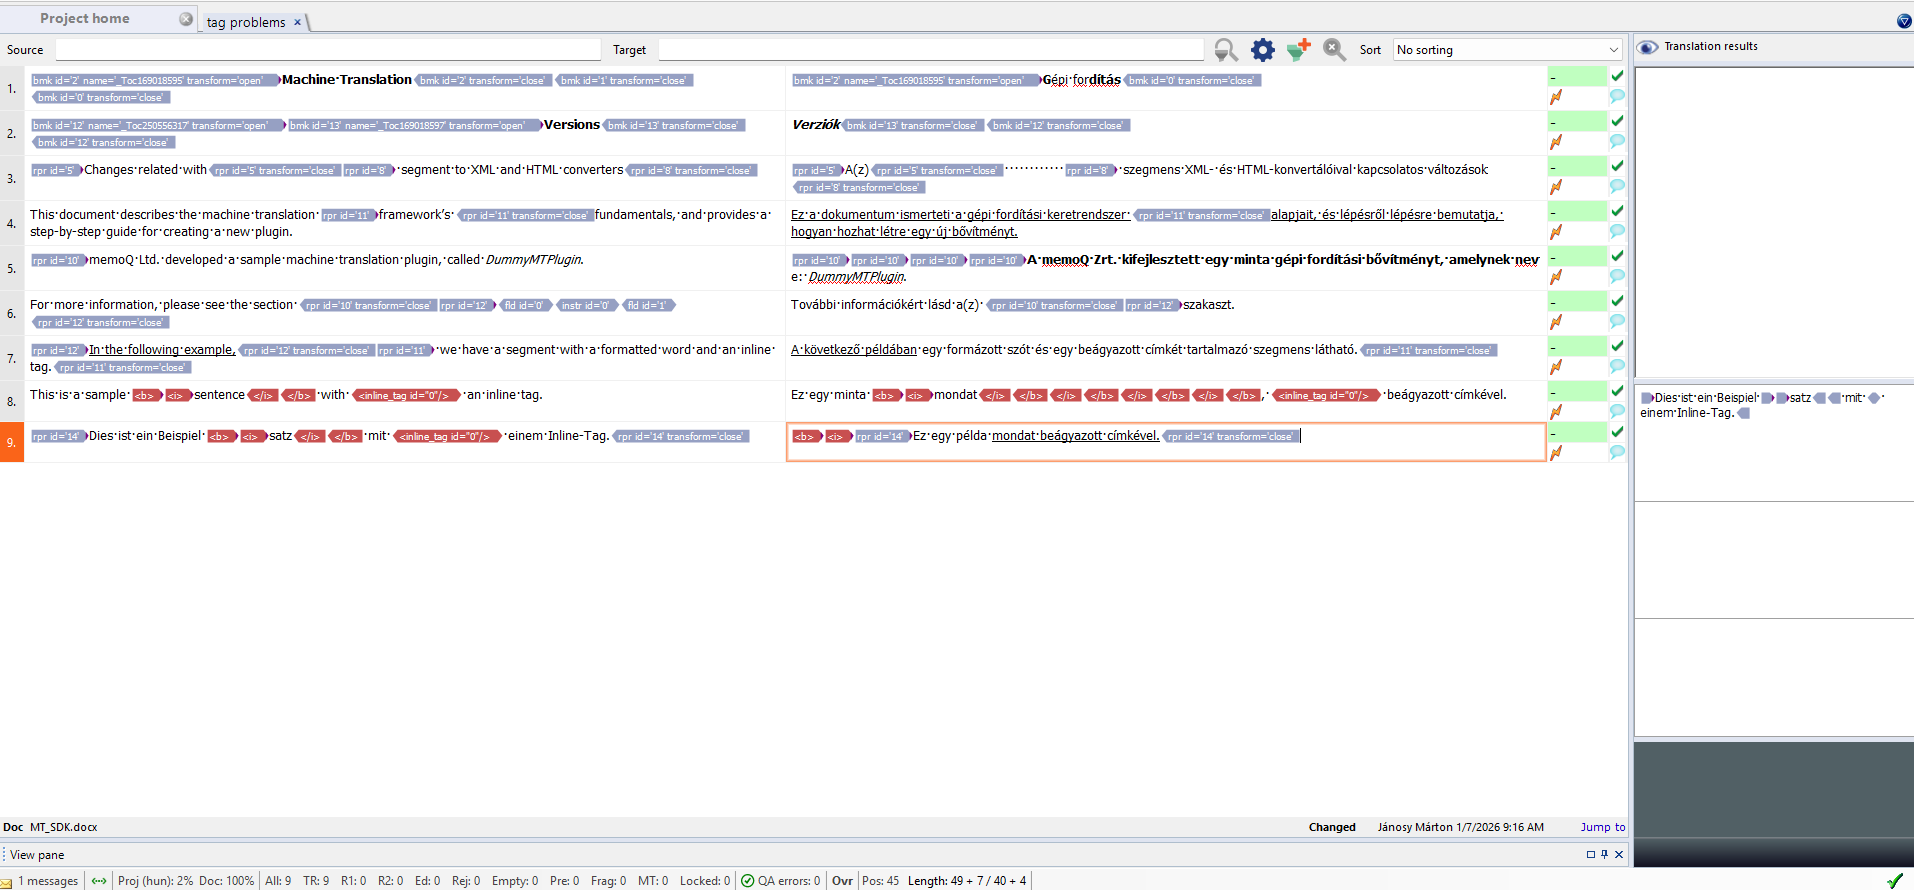
Before: Tag errors in MemoQ
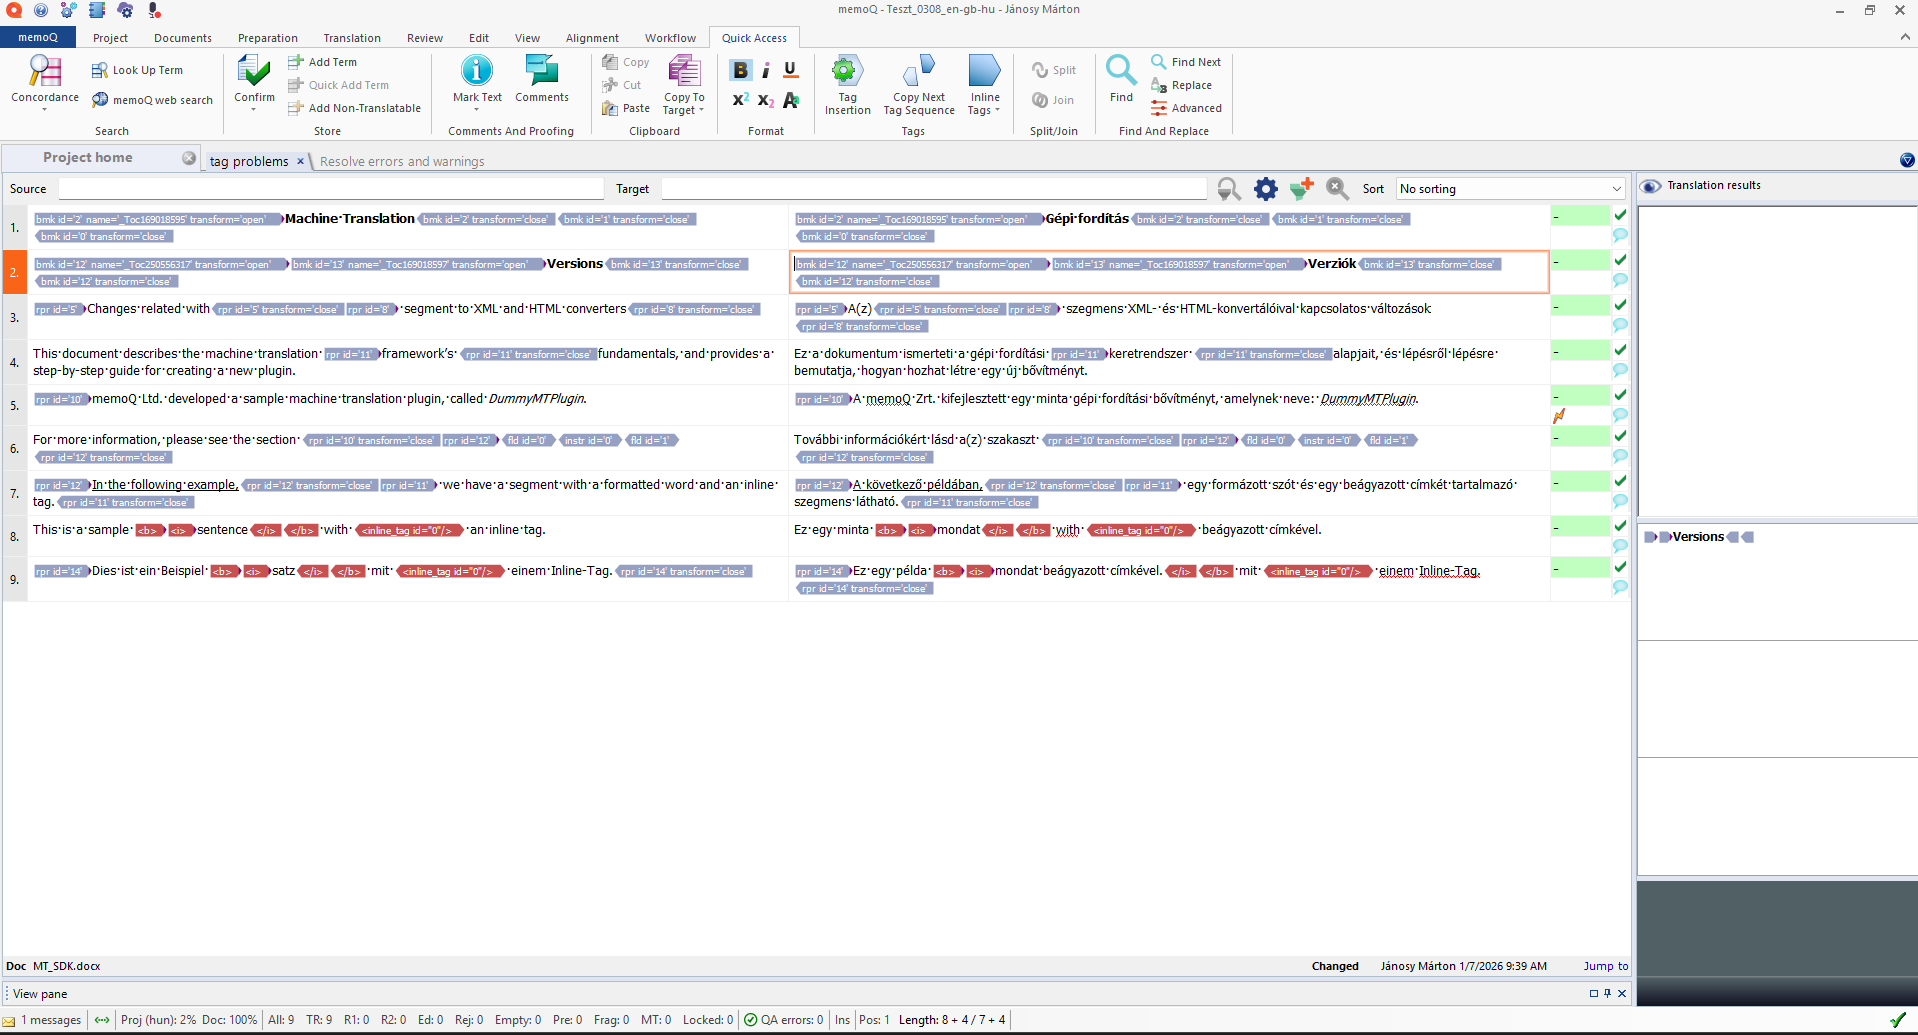
After: Corrected tags
3. Preparation (Source Rephrasing)
This workflow is useful when the source text is poorly written (e.g., machine-generated or non-native speaker) and you want to improve it before translation, or if you simply need to paraphrase text.
Configuration
- Write to: Set to Source (this overwrites the source segment in the MQXLIFF).
-
Schema Settings:
- Enable Populate JSON input schema.
- Check Source Text.
- Uncheck other context fields like references or terms if they are not relevant for rephrasing.
Example Prompt
Refer to the Prompting Guide for available fields and options.
- Do not translate the text.
- Preserve the original meaning.
- Fix any typos or awkward phrasing.
Return a JSON object with the rewritten source text.
Scenario 2: Tagging Source Text
Download Source Tagger PromptModifying the source text may be necessary sometimes, particularly when standard regex taggers fail to capture complex patterns like product codes or SKUs.
This workflow uses a focused prompt (downloadable above) designed to strictly identify and wrap these elements in tags without altering any other part of the text, enabling downstream tools to recognize them as content to tag.
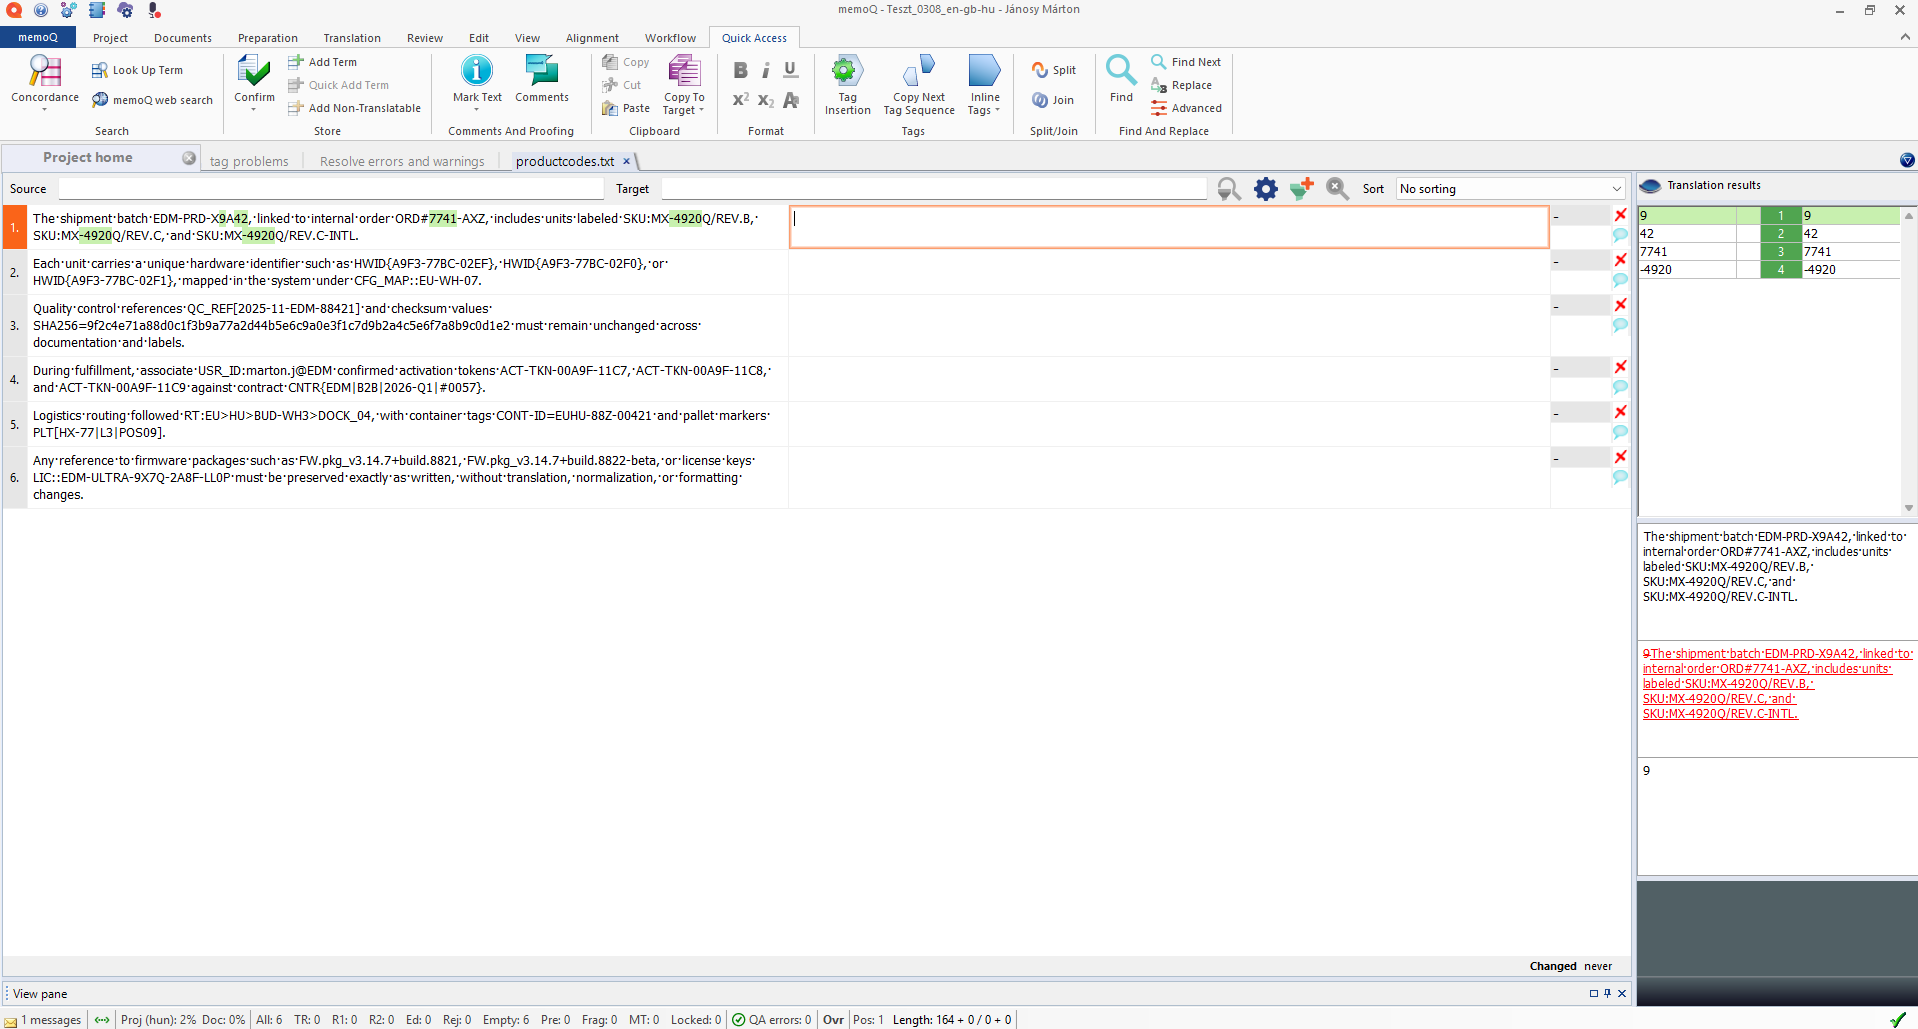
Original source text in MemoQ (hard to tag with regex)
Configuration
- Write to: Set to Source.
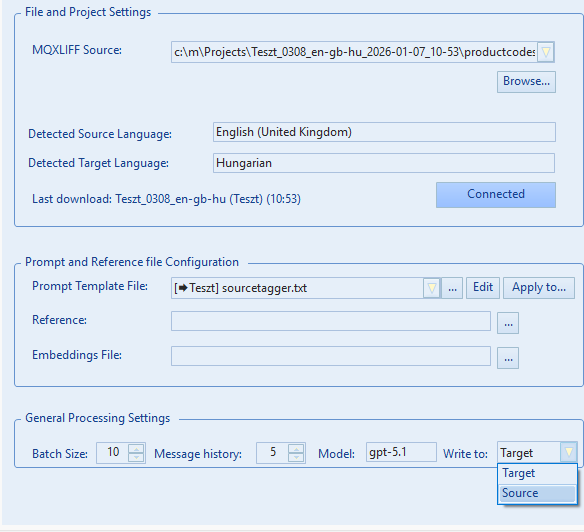
It is recommended to uncheck unnecessary JSON keys for this task (e.g., references or examples), and perhaps rename source_text to text_to_tag to be more explicit (though optional).

Once the processed file is updated in MemoQ, all identified taggable content is in a uniform format (e.g., between < >), enabling you to use the Regex tagger effectively.
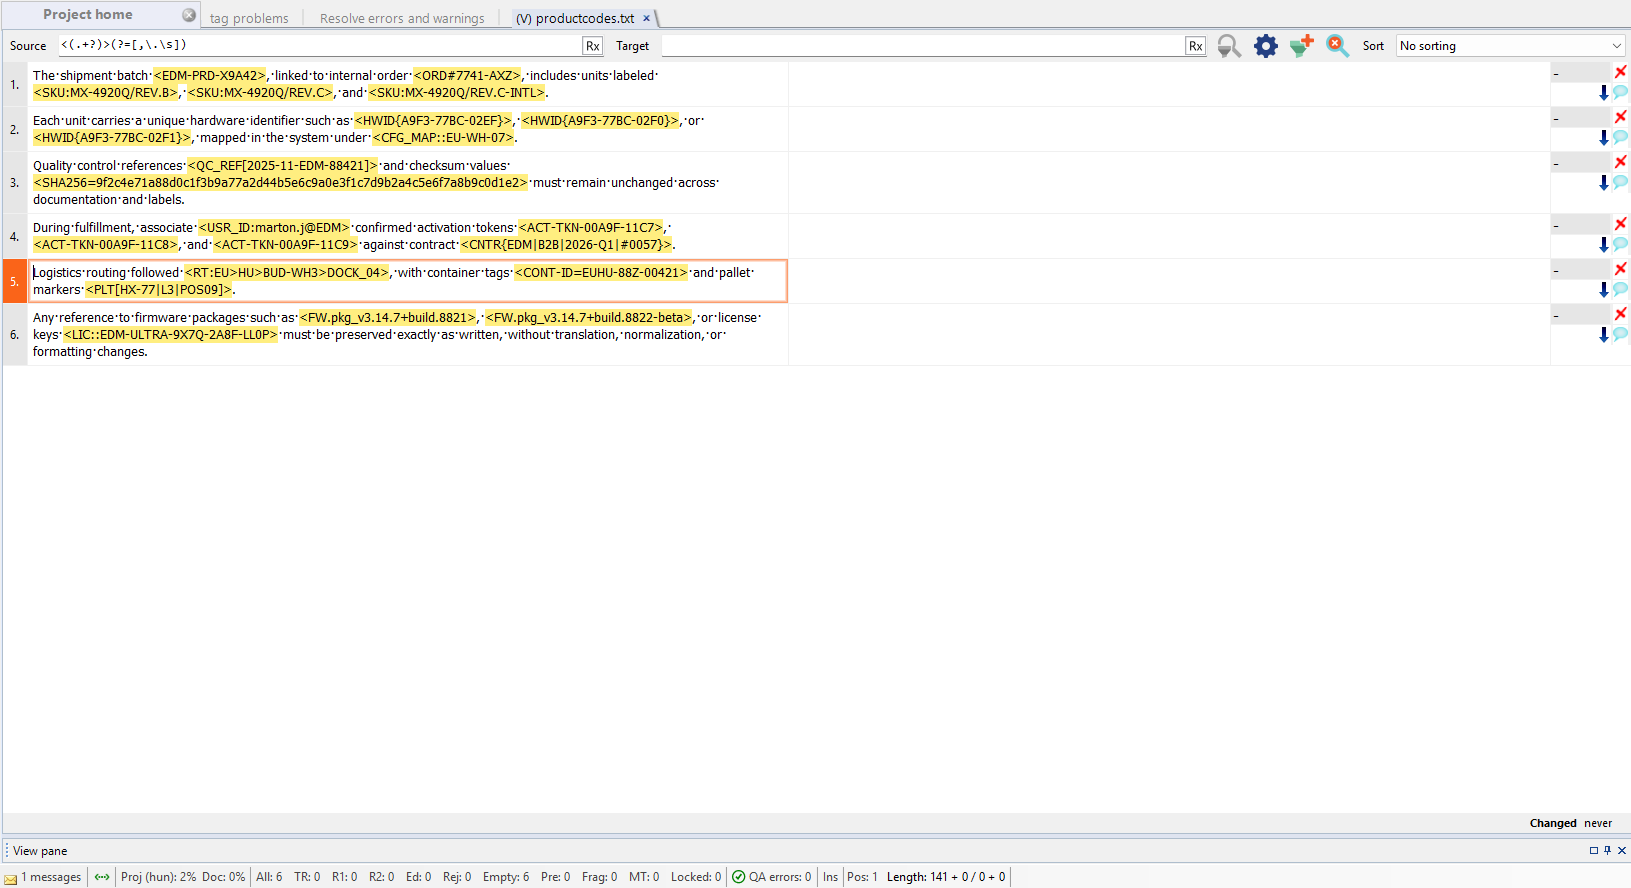
Result: Uniformly tagged source text
4. Term Extraction (CSV Export)
Download Term Extraction PromptThis workflow is designed for terminology extraction from bilingual content without changing anything in memoQ. Instead of writing back into MQXLIFF, PromptLoc exports the results to a CSV, which you can review, filter, and process further before importing into a termbase or other tools.
Configuration
- Write to: Set to CSV.
(Non-destructive: no changes are written to Source or Target segments in the MQXLIFF.) -
Schema Settings (recommended):
- Enable Populate JSON input schema.
- Enable Source Text.
- Enable Target Text if you want to extract bilingual term pairs from an existing translation.
- (Optional) Enable
terms,forbidden_terms, andmemoq_examplesif you want the model to respect existing terminology or reuse TM wording.
- Prompt template: Use the dedicated Terminology Extraction prompt.
How it works
For each segment, the model returns a single string that contains:
- One or more term pairs formatted as:
Source root form = Target root form - Multiple pairs separated by semicolons (
;) - A placeholder value (for example
-) when no valid term candidates are found
The LLM cannot return an empty string as a response. For this reason, your prompt must require a placeholder value (such as -, N/A, or NONE) when no extractable terms are present in a segment.
Using a consistent placeholder makes it easy to filter out non-term rows in Excel or scripts, avoid malformed cells, and reliably distinguish “no terms found” from processing errors.
Result
After processing, PromptLoc creates a *_processed.csv file in the processed output folder. The CSV contains the enabled schema fields plus a Response column holding the extracted term data.
Note on post-processing the CSV:
The extracted terminology is returned as a compact string format, which typically requires additional processing before it can be used as a termbase:
- Split multiple term pairs into separate rows using
; - Split each pair into Source term and Target term using
= - Normalize casing and whitespace
- Deduplicate term pairs
- If multiple valid equivalents are allowed for a single source term, you may need an extra step to split or duplicate rows accordingly
This extra processing step is intentional: it keeps PromptLoc flexible and allows you to adapt the output to the exact structure required by your terminology management workflow.
Other Use Cases
These are just a few examples. PromptLoc is flexible:
- Transliteration: e.g., Serbian Cyrillic and Latin.
- Text expansion/shrinking: Adjusting text length constraints.
- Tagging source: Tagging content that would be hard to capture with classic regex based rules.
- Style Adaptation: Use prompts to rewrite the target text into a specific tone (e.g., "Marketing", "Formal", "Playful").
Experiment with different prompts and schema configurations to find what works best for your project!
The References Function: Semantic Search
The Reference Function is one of the most powerful tools in PromptLocMT. It allows the AI to "read" an entire external document (like a law, a manual, or a style guide) and only pick the relevant parts for each sentence it translates.
Semantic Search: The "Magic" Behind References
Unlike traditional Translation Memories (TMs) and LiveDocs which look for matching words, the Reference function uses Vector Embeddings (Semantic Search).
Key Concept: Meaning over Matching Strings
The relevant reference lines do not have to share any strings with the translatable text to match. The AI matches based on meaning.
For example, if your source text says "The tenant must pay by the 5th", the tool can find a reference line in a law saying "Rent is due in the first week", even though they share almost no words.
Example Scenario: Legal Translation
Scenario: You are translating a Lease Agreement from English to Spanish.
Setup: You load the Spanish Civil Code (in Spanish) as your Reference file.
| Source Text (English) | Matched Reference (Spanish Law) | Why it matched |
|---|---|---|
| "The tenant shall be liable for any damages caused to the property." | "La parte que cause daños a la otra parte por incumplimiento del contrato será responsable..." (Liability for damages caused by breach...) | Semantic Match. The AI knows "liable for damages" equates to the legal concept in the reference line, even across languages. |
Result: The AI uses the official legal terminology found in the reference when generating the translation.
Bonus Tip: Unaligned Documents
If you have unaligned document pairs, you can skip alignment if you use this function. You can just load your existing translations as reference and it will not only pull the most relevant bits to each translation segment (practically aligning them) but also adapt and correct them if the sentence pairs are not perfect translations of each other.
How to Prepare & Load References
1. Preparation (.txt)
Create a standard .txt file (UTF-8). The rule is simple: One Line = One Chunk.
The party who causes damage to the other party by breaching the contract shall be liable...
Unless he proves that the breach of contract was caused by a circumstance outside his control...
Section 6:143 [Foreseeability]
Damages shall be compensated to the extent that the obligee proves...
Each line above becomes a searchable "chunk" for the AI.
2. Loading
In the main settings window, look for the References field. Click "Browse" and select your .txt file.
First Run Delay: The first time you use a new reference file, the tool will take some time (this depends on the settings, e.g. embedding batch size, and the length of your reference file) to "embed" it (send it to OpenAI to be converted into vectors). It saves these as a hidden _embeddings.json file so next time it is instant.
Language Independence
References are language agnostic. You can mix languages in the same file.
- Source-Language References: Good for explaining concepts or obscure acronyms.
- Target-Language References: If relevant unaligned existing translations are available.
- Mixed: You can have a file with both source and target language reference texts. The AI will pull the relevant ones based on meaning.
Prompting with References
To use these references, your Prompt Template needs to know where to put them. See the Prompting Guide for full details on placeholders and JSON fields.
1. Legacy Mode (Simple)
Use the %REFERENCES% placeholder. The AI will see only the most relevant lines extracted from your file.
Example Prompt:
Here are some relevant excerpts from the applicable law that may guide your terminology:
"""
%REFERENCES%
"""
Source Text: ...
2. Rich Schema Mode (Advanced)
In this mode, references are injected directly into the JSON object for each segment. You do not need a placeholder, but you should instruct the AI to look at the references field.
Example Prompt:
- "source_text": The text to translate.
- "references": Relevant excerpts from applicable laws or manuals.
Instructions:
Translate the "source_text" into %TARGETLANG%.
- Review the "references" provided for each segment.
- Use the terminology and style found in the "references" to ensure legal accuracy.
Prompting Guide
This application supports two distinct prompting modes: Legacy Mode (Simple) and Rich Schema Mode (Advanced). The mode is determined by the "Use JSON Schema" setting in the Processing Settings.
Crucial Instructions
Regardless of the mode, you must explicitly include instructions in your prompt to handle context and tags. We recommend adding the following directives to your prompt template:
- Context: "Ensure that the translation maintains the context and continuity across different segments and sections of the json structure to preserve the coherence and meaning of the original text. This should be true not only within messages, but also across messages in the conversation."
- Tags: "Maintain the exact structure of the original document, including all specified tags such as
{{1}},{{2}}and any others exactly as they appear."
1. Legacy Mode (Simple JSON)
In this mode, context (glossaries, examples, etc.) is injected directly into the text of your prompt using placeholders. The input data sent to the LLM is a simple JSON dictionary of source segments.
Placeholders
You must include these placeholders in your prompt template. The application will replace them with the relevant data before sending the request to the LLM.
| Placeholder | Description |
|---|---|
%SOURCELANG% |
The name of the source language (e.g., "English"). |
%TARGETLANG% |
The name of the target language (e.g., "German"). |
%TERMS% |
A list of allowed terms found in the Termbase (TB), formatted as source = target. |
%FORBIDDENTERMS% |
A list of forbidden terms found in the TB, formatted as source ≠ target. |
%REFERENCES% |
Relevant reference segments found in the reference files or embeddings. |
%EXAMPLES% |
Translation examples (fuzzy matches) found in the Translation Memory (TM), formatted as Source\nTarget pairs. |
Input Data Structure
The LLM receives the prompt followed by a simple JSON object containing the segments to translate:
"segment1": "The source text for the first segment.",
"segment2": "The source text for the second segment."
}
Example Legacy Prompt
Use the following terminology:
%TERMS%
Avoid these forbidden terms:
%FORBIDDENTERMS%
Use these references for context:
%REFERENCES%
Here are some examples of past translations:
%EXAMPLES%
Translate the following JSON segments. Return only the translated JSON object.
2. Rich Schema Mode (Advanced)
In this mode, context (terms, examples, references) is not injected into the prompt text. Instead, it is structured inside the input JSON object itself for each segment. This allows for granular, segment-level context.
Placeholders
Most placeholders are disabled in this mode because the data is in the JSON.
| Placeholder | Behavior in Schema Mode |
|---|---|
%SOURCELANG% |
Active. Replaced with the source language name. |
%TARGETLANG% |
Active. Replaced with the target language name. |
%TERMS% |
Removed. (Data is in the terms JSON field). |
%FORBIDDENTERMS% |
Removed. (Data is in the forbidden_terms JSON field). |
%REFERENCES% |
Removed. (Data is in the references JSON field). |
%EXAMPLES% |
Removed. (Data is in memoq_examples or internal_examples JSON fields). |
Input Data Structure
The LLM receives the prompt followed by a rich JSON object. Your prompt must instruct the LLM to read this structure.
"segment1": {
"source_text": "The text to translate.",
"terms": { "term": "translation" },
"forbidden_terms": [ { "source": "bad_term", "forbid": ["avoid_this"] } ],
"references": [ "Similar sentence context..." ],
"memoq_examples": [ { "source": "Old source", "target": "Old target" } ],
"maxlength": 100
},
...
}
JSON Fields
The keys used in the input JSON can be customized in the Processing Settings. The defaults are:
source_text: The segment text to be translated.target_text: Existing target text (if any).terms: Dictionary of mandatory terms for this segment.forbidden_terms: List of terms to avoid for this segment.references: Contextual reference text specific to this segment.memoq_examples: TM matches from MemoQ.internal_examples: Fuzzy matches from within the current file batch.comments: Comments from the XLIFF file.maxlength: The maximum allowed length for the translation (if > 0).
Resource Prioritization
If Include TM/TB names in JSON context is enabled under File -> Advanced Processing Settings, PromptLoc can add memoQ resource names to the rich JSON context. For example, memoq_examples entries may include tm_name, while TB-derived term data may include tb_name or tb_names. PromptLoc does not enforce priority automatically; you can use these fields in your prompt to tell the model which resources should win when context sources disagree.
Example: prioritize one TM over other examples and drafts
Some `memoq_examples` entries may include `tm_name`, indicating the memoQ translation memory they came from. Treat examples from `tm_name: "Client_Master_TM"` as the highest-priority translation memory evidence.
Priority order:
1. If a `memoq_examples` entry from `Client_Master_TM` is an identical source match, reuse its target translation exactly unless it violates forbidden terms, tag/placeholder preservation, or the required JSON output format.
2. If a `memoq_examples` entry from `Client_Master_TM` is a close or partial match, follow its terminology, phrasing, register, and style as the primary reference, adapting only what is needed for the current source text.
3. When `Client_Master_TM` conflicts with other `memoq_examples`, `internal_examples`, or `target_text`, prefer `Client_Master_TM`.
4. Never use a `Client_Master_TM` example to justify forbidden terms, broken grammar, mistranslation, missing content, altered proper names, or changed/missing tags.
Example: prioritize a TM against terminology, with guardrails
When a `memoq_examples` entry from `Client_Master_TM` conflicts with `terms`, prefer the `Client_Master_TM` example if it is an identical or very close match and fits the current context.
Use `terms` instead of the TM example when:
1. The term is clearly mandatory for the current client, product, legal, technical, or UI context.
2. The TM example is outdated, mistranslated, incomplete, ungrammatical, or inconsistent with the source segment.
3. The TM example would introduce a forbidden term, alter required tags/placeholders, or break the required JSON output format.
If both are acceptable, choose the wording that best preserves client consistency and natural target-language style.
Example: prioritize one TB when termbases disagree
Some terminology entries may include `tb_name` or `tb_names`, indicating the memoQ termbase they came from. Treat entries from `Client_Approved_TB` as the highest-priority terminology evidence.
Priority order:
1. If duplicate or conflicting terms are provided, prefer entries where `tb_name` is `Client_Approved_TB` or `tb_names` contains `Client_Approved_TB`.
2. Apply the preferred TB term consistently across all relevant segments, unless it is clearly inappropriate for the current context.
3. If a lower-priority TB conflicts with `Client_Approved_TB`, ignore the lower-priority term unless the preferred term is clearly wrong.
4. Never use a preferred TB term if it appears in `forbidden_terms` or would break grammar, meaning, tags/placeholders, or the required JSON output format.
Example Schema Prompt
Input Structure:
The input is a JSON object where each key (e.g., "segment1") represents a text segment. Each segment value is an object containing:
- `source_text`: The text to translate.
- `terms`: A dictionary of mandatory terminology (source -> target).
- `forbidden_terms`: A list of terms to avoid.
- `references`: Contextual reference text.
- `memoq_examples` / `internal_examples`: Previous translation examples for style/consistency.
- `maxlength`: Maximum allowed length for the translation (if > 0).
Instructions:
Translate each `source_text` into %TARGETLANG%.
- Strictly adhere to the `terms` provided for each segment.
- Use `examples` and `references` to guide your style and consistency.
- Return a single JSON object where keys match the input (e.g., "segment1") and values are the translated strings.
Verification Checks
Verification checks are an advanced prompting technique. By asking the model to explicitly "verify" its work before finalizing the output, you encourage a "Chain of Thought" process. This self-correction step significantly reduces hallucinations and improves adherence to strict constraints (like tags or terminology).
Include a section like this at the end of your prompt:
Before outputting the final JSON, perform the following checks silently:
1. Consistency: Verify that if an identical sentence exists in the examples, the exact translation is reused; if a similar sentence is available, adapt it only as necessary.
2. Context: Verify that the translation fits the context of previous messages and the JSON structure.
3. Format: Verify that the response contains only the valid JSON object and no conversational text.
4. Tags: Verify that the number and order of tags (e.g., {{1}}) match the source exactly. Ensure no whitespace is added around tags unless present in the source.
5. Terminology: Verify that all glossary terms are used correctly and no unauthorized synonyms are introduced.
After verifying, output the final JSON.
Advanced: Developer Prompts
You can optionally separate the "Developer" (System) instructions from the rest of the prompt. This allows you to define a persona and strict rules that the model should prioritize.
To use this feature, enclose the developer instructions between ### DEVELOPER_START and ### DEVELOPER_END markers:
You are a highly skilled translator... [System Instructions]
### DEVELOPER_END
[Rest of the prompt / User Message]
CLI Options
PromptLoc supports a headless Command Line Interface (CLI) mode for integrating into automated workflows through the memoQ WS API.
Usage
Required Arguments
| Argument | Description |
|---|---|
--cli |
Activates the CLI mode. Without this, the application launches the GUI. |
--project <GUID> |
The MemoQ Project GUID. (memoQ project templates can pass this as a parameter) |
--document <GUID> |
The MemoQ Document GUID to translate. (memoQ project templates can pass this as a parameter) |
--prompt <path> |
Absolute path to the text file containing the prompt template. |
Optional Arguments
| Argument | Description | Default |
|---|---|---|
--model <name> |
The OpenAI model to use (e.g., gpt-5.2, gpt-4o-mini). |
User Settings |
--batch <num> |
Number of segments to process in a single API request. | User Settings |
--history <num> |
Number of previous segments to include as context. | User Settings |
--writeto <val> |
Where to write the translation: Target, Source |
Target |
--workdir <path> |
Directory to download/process files in. | User Settings |
--update |
If present, uploads the translation back to the MemoQ server and updates the document. | false |
Examples
1. Basic Translation (Default Settings)
Downloads the document, translates it using your saved settings (model, history, etc.), and saves the result locally.
2. Custom Model & Batch Size
Overrides user settings saved through the GUI to use a specific model and larger batch size.
3. Full Automation (Translate & Update Server)
Translates the file and immediately uploads it back to the MemoQ server, updating the document in place.
4. Write to Source Column
Useful for correcting grammar in source text before translations.
Notes
- Authentication: The CLI uses the credentials stored in
MemoQCredentials.datandOpenAISettings.datin the user's AppData. You must run the GUI version at least once to configure these settings. - Logs: Execution logs are written to
cli_debug.login the application directory.